You dropped a custom model into Source Filmmaker, hit play, and instead of your character, you got a purple-and-black checkerboard staring back at you.
That’s not a bug. It’s SFM telling you the model was never compiled.
Source Filmmaker doesn’t read raw 3D files the way Blender or Maya does. It only understands its own compiled format, and getting there is what everyone means when they say “sfm compile.” This guide walks through what that actually involves — the tools, the steps, the errors you’ll hit, and how to think about the process so it stops feeling like a black box.
What SFM Compile Actually Means
The term gets used two different ways, and mixing them up is where a lot of confusion starts.
Asset compilation is the technical one: turning a 3D model, its skeleton, and its textures into a Source-engine-readable .mdl file. This is what Valve’s own documentation refers to when it talks about compiling.
Final compile or “rendering” is the looser, community version: exporting a finished SFM project into a viewable video. Some creators say “I’m compiling my video” when they mean “I’m rendering it.”
Both are legitimate uses. But if you’re troubleshooting a purple checkerboard model, you’re dealing with asset compilation — not rendering. This article focuses on that side, since it’s the one that actually trips people up.
Why SFM Can’t Just Use Your Model As-Is
Source Filmmaker runs on the same engine as Half-Life 2, Team Fortress 2, and other Source titles. That engine was built for real-time performance, not flexibility with arbitrary file formats.
A model you build in Blender is editable, uncompressed, and full of information the engine doesn’t need at runtime. The Source engine wants something leaner: a binary .mdl file paired with matching .vtx, .vvd, and .phy files, each optimized for fast loading and rendering.
Compiling is the translation step between “editable creative file” and “something the engine can actually load.” Skip it, and SFM has nothing to render — hence the checkerboard, which is really just the engine’s built-in placeholder for “texture not found.”
The Compile Pipeline, Step by Step
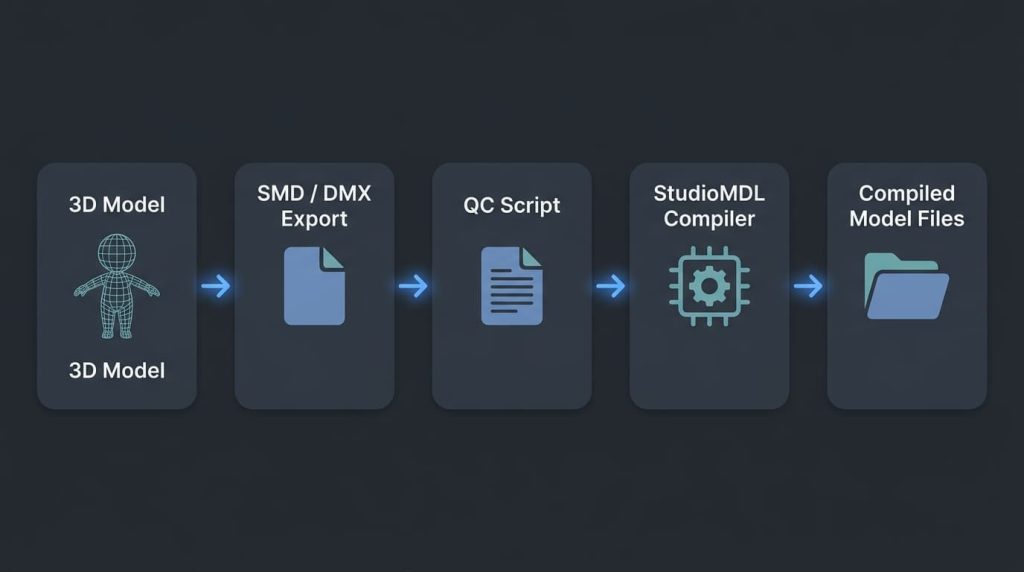
Every custom model follows roughly the same path, regardless of what you built it in.
1. Build or acquire the 3D model
This starts in a modeling tool — Blender is the most common choice now, though 3ds Max and Maya still show up in older workflows. At this stage you’re worried about topology, rigging, and UV mapping, not Source-specific formatting yet.
2. Export to SMD or DMX
Source can’t read .blend or .max files. You export to SMD (Studiomdl Data) or DMX (Datamodel Exchange) instead — SMD is older and more universally supported, DMX handles some newer features better. Most creators use the Blender Source Tools plugin to handle this export cleanly, since it accounts for Source’s bone-naming and axis conventions automatically.
3. Write the QC file
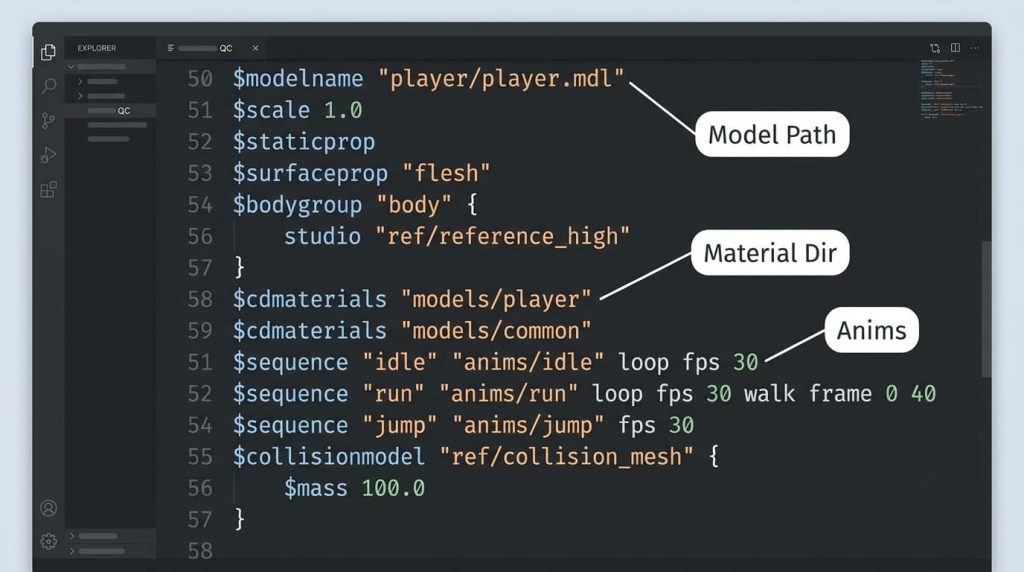
The QC file is a plain-text script that tells the compiler what to do with your exported files: which SMDs to use for the reference model, which for physics collision, what the model’s name and scale should be, which materials to attach, and so on.
This is the part beginners find most opaque, mostly because a single wrong path or missing line produces an error with no obvious cause. In practice, most QC problems come down to one of a handful of things: a mistyped file path, a missing $cdmaterials line pointing to the wrong texture folder, or a bone hierarchy that doesn’t match what the SMD actually contains.
4. Run StudioMDL
StudioMDL is Valve’s official command-line compiler. You point it at your QC file, and it reads the referenced SMDs, textures, and settings, then outputs the compiled model files — .mdl, .vtx, .vvd, and .phy if you included collision data.
Running it directly from the command line is the most transparent way to compile, because you see every warning and error as it happens. Tools like Crowbar and GUIStudioMDL wrap this same process in a friendlier interface, which is worth using once you understand what’s happening underneath — less useful as your only method, since they can obscure exactly which step failed.
5. Place the compiled files correctly
Compiling doesn’t automatically make a model usable. The output files need to land in the right folder structure inside your usermod or game content directory — typically under models/ for the compiled model and materials/ for its textures, mirroring the paths you set in the QC file.
This step is where a surprising number of “my compile succeeded but the model still won’t show up” problems actually live. The compile worked; the files just aren’t where SFM is looking for them.
6. Load it into SFM
Only now does the model become available inside Source Filmmaker’s asset browser, ready to drop into a scene like any stock asset.
Tools You’ll Actually Need
You don’t need much beyond the essentials:
- A 3D modeling program. Blender is the practical default — free, well-supported by the Source community, and the Source Tools plugin is built specifically for it.
- Blender Source Tools. Handles SMD/DMX export and QC-friendly formatting from inside Blender.
- StudioMDL. Comes bundled with Source Filmmaker’s SDK. This is the actual compiler; everything else is scaffolding around it.
- Crowbar. A GUI for compiling and decompiling models, useful for beginners and for reverse-engineering existing Source models to see how their QC files are structured.
- VTFEdit. For converting and previewing Source’s
.vtftexture format, since SFM won’t read standard PNGs or JPEGs directly.
That’s genuinely the full toolkit for most character and prop compiles. Map compiling (for custom environments) involves a different set of tools entirely, since it runs through the separate BSP compile process rather than StudioMDL.
Common Compile Errors (And What They Actually Mean)
“Error opening qc file” — Usually a path problem. StudioMDL is picky about relative versus absolute paths, and a QC file that looks fine to you can still point somewhere the compiler can’t find.
Purple-and-black checkerboard texture in SFM — Not a compile error at all. This means the model compiled, but SFM can’t locate the material files. Check your $cdmaterials path in the QC and confirm the VTF/VMT files are actually sitting in that folder.
“Bone doesn’t exist” or skeleton mismatch errors — The SMD reference model and the animation SMDs don’t share an identical bone hierarchy. This usually happens when animations were exported from a rig that got modified after the base model was already exported.
Model appears but is invisible or inside-out — Almost always a normals issue from the source 3D file. Recalculating normals in Blender before export fixes this more often than not.
Compile “succeeds” with no visible errors, but nothing shows up in SFM — Check the output folder against your game’s actual content directory. A successful compile that writes files to the wrong place looks identical to a failed one from inside SFM.
If none of these match what you’re seeing, pasting the raw StudioMDL output into ChatGPT and asking it to explain the specific line it’s failing on works surprisingly well — it’s built to take an error message and walk through what’s actually causing it, which helps when the error text itself is too terse to act on.
One thing that’s easy to miss: StudioMDL will often compile something even when your QC has real problems, because it’s fairly forgiving about missing optional data. A model that compiles without errors isn’t automatically a model that’s correct — always check it in SFM before assuming it’s done.
Asset Compile vs. Final Render — A Quick Comparison
| Asset Compile | Final Compile / Render | |
|---|---|---|
| What it produces | .mdl model file | Video or image sequence |
| Tool used | StudioMDL | SFM’s built-in render/export |
| When it happens | Before a model can be used in any scene | After a scene is fully animated |
| Typical failure | Missing files, path errors, checkerboard textures | Long render times, codec issues, missing motion blur settings |
| Who needs it | Anyone using custom models or props | Anyone finishing a movie for export |
Knowing which one you’re dealing with saves a lot of wasted troubleshooting. A checkerboard texture problem has nothing to do with your render settings, and a slow export has nothing to do with your QC file.
Practical Tips for a Cleaner Compile Workflow
Keep a consistent folder structure from the start. Decide early where models, materials, and QC files live relative to each other, and stick to it. Most compile headaches trace back to inconsistent paths built up over a messy project.
Compile early and often. Don’t build an entire character, rig it, texture it, and animate it before your first compile attempt. Compile a rough version as soon as you have a basic mesh, confirm it loads in SFM, then keep iterating. Catching a bone-naming issue on a simple mesh takes minutes; catching it after a full rig is built takes hours.
Use Crowbar to decompile reference models. If you’re unsure how a working Source model’s QC file is structured, decompiling a similar stock model shows you a real, functioning example rather than guessing from documentation.
Watch your material paths specifically. More checkerboard-texture reports trace back to $cdmaterials mismatches than to any other single cause. It’s worth double-checking before you assume something more complicated is wrong.
Don’t skip LODs and collision models for anything used repeatedly. They’re optional in a QC file, and skipping them gets you a working model faster. But a prop without a physics model can behave strangely if it’s ever meant to interact with a scene physically, and skipping LODs only matters once you’re using a model at a distance — worth adding once you know a model is a keeper.
Frequently Asked Questions
Do I need to know how to code to compile SFM models? No. QC files use a simple scripting syntax, not a programming language, and most of it is copy-adapt-repeat once you understand the structure.
Can I compile a model without a 3D modeling background? Basic file management and an understanding of QC scripts are enough for simple props. Anything involving custom rigging or animation benefits from at least basic modeling knowledge.
Does Crowbar replace StudioMDL? No — Crowbar is a wrapper around StudioMDL, not a replacement. It simplifies the interface but runs the same underlying compiler.
Can I compile models exported from Blender? Yes. Blender, paired with the Source Tools plugin, is the most common starting point for custom SFM models today.
Why does my model compile but not appear in SFM? Usually a mismatch between where the compiled files were written and where SFM’s content directories expect to find them. Check your output paths against your actual usermod folder structure.
The Takeaway
SFM compile isn’t one mysterious process — it’s a translation step, and every part of it exists to solve a specific, understandable problem. The moment you see it that way, the checkerboard textures and cryptic QC errors stop feeling random and start feeling like exactly what they are: file paths pointing somewhere they shouldn’t. Learn to read those signals once, and every compile after your first working one gets noticeably faster.